To change DNS server in your Spectrum router, log into your router’s web interface and navigate to the DNS settings. Input the new DNS server address and save the changes.
Changing the DNS server in your Spectrum router allows you to improve your internet connection speed, security, and accessibility. By customizing your DNS server, you can enhance your browsing experience and better control your internet traffic. In this guide, we’ll walk you through the steps to change the DNS server in your Spectrum router, providing you with an easy method to optimize your internet settings to suit your specific needs.
Follow these simple instructions to take control of your DNS server and enjoy a more efficient online experience.

Credit: cleanbrowsing.org
Understanding Your Spectrum Router
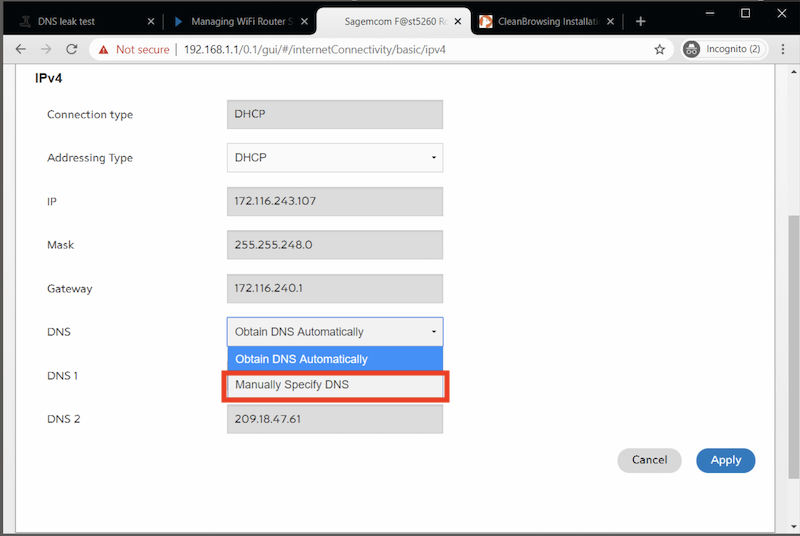
If you want to change DNS server in your Spectrum router, first you need to understand your router and access its settings. To access the router settings, you can open a web browser and enter the default IP address of your router in the address bar. Once you enter the IP address, you will be prompted to enter the username and password for your router. After successfully logging in, you will be able to navigate through the router settings.
To locate the DNS settings, you can look for a “Network” or “Internet” tab in the router settings. Under this tab, there might be a section called “DNS” or “DNS Settings”. Click on this section to access the DNS settings. Here, you will be able to enter the preferred DNS server addresses provided by your internet service provider or any other DNS server of your choice. Don’t forget to save the changes after entering the DNS server addresses. Once saved, the DNS server in your Spectrum router will be changed accordingly.

Credit: cleanbrowsing.org
Choosing The Right Dns Server
Learn how to change the DNS server on your Spectrum router and ensure a reliable internet connection. By following a few simple steps, you can choose the right DNS server that suits your needs.
| Benefits of Selecting the Right DNS Server |
| 1. Improves internet speed and reliability. |
| 2. Enhances online security and privacy. |
| 3. Access geo-blocked content easily. |
Popular DNS Servers to consider: Google DNS, OpenDNS, Cloudflare.
Each has its own advantages and can impact your online experience. Make sure to research and choose the one that best fits your needs.
Changing Dns Server In Spectrum Router
To change DNS server in your Spectrum Router, login to the router dashboard, and navigate to the DNS settings. Look for the DNS server fields and enter the new DNS server information provided by your ISP.
Save the changes and restart your router to apply the new DNS server settings. Ensure the connection is stable after the changes. If you encounter any issues, revert back to the default DNS settings or contact your ISP for assistance.
Verifying Dns Changes
After making changes to your DNS server on your Spectrum router, it’s essential to verify if the changes have been successfully applied.
One way to confirm the DNS configuration is by visiting a website in your browser. If the webpage loads without any issues, it indicates that the DNS changes have been implemented correctly.
If you’re experiencing any problems, it’s time to troubleshoot common issues that may be causing the DNS change to not work as expected.
| Issue | Possible Solution |
|---|---|
| The webpage is not loading after DNS change | Restart your router and device. Clear cache and DNS cache. Try using alternative DNS servers or contact your service provider. |
| Slow internet connection | Check your internet speed. Upgrade your internet plan if necessary. Consider using a reputable DNS server. |
By addressing these common DNS configuration issues, you can ensure a smooth transition after changing the DNS server on your Spectrum router.
Optimizing Dns Settings For Performance
When it comes to optimizing DNS settings for performance, it’s essential to understand the factors that impact DNS performance. By changing the DNS server in your Spectrum router, you can improve the speed and reliability of your internet connection. One key factor to consider is the distance between your router and the DNS server, as this can impact the response time for DNS queries. Additionally, the reliability and uptime of the DNS server are crucial for ensuring a stable internet connection. By selecting a fast and reliable DNS server, you can enhance your browsing experience and reduce latency when accessing websites. In conclusion, taking the time to configure your router’s DNS settings can lead to noticeable improvements in performance.
Enhancing Security Through Dns
Changing the DNS server on your Spectrum router can enhance security by utilizing DNS for increased protection. You can implement DNS security features to safeguard your network from potential threats. By adjusting the DNS server settings, you can improve security measures and enhance your online safety. Consider updating your DNS server to strengthen security and protect your network from potential risks.
Credit: cleanbrowsing.org
Conclusion
Changing the DNS server in your Spectrum router is a simple yet significant step in optimizing your internet connection. By following the step-by-step process outlined in this guide, you can enhance your browsing speed, security, and overall online experience. Take control of your network settings and enjoy a more efficient and seamless internet connection today.